หากคุณเคยใช้ Claude Code, Codex หรือ AI Coding Agent ทำงานกับโปรเจกต์จริงหลายชั่วโมงแล้วพบว่า “เซสชันแรกเขียนได้สวย พอขึ้นเซสชัน 2–3 กลับลืมบริบท ทำหลายฟีเจอร์ค้างครึ่งๆ กลางๆ หรือบอกว่าเสร็จแล้วทั้งที่เทสต์พัง” — คอร์ส Learn Harness Engineering (0 to 1) จาก WalkingLabs (github.com/walkinglabs/learn-harness-engineering, กว่า 25,579+ Stars, MIT License) คือคำตอบที่เป็นระบบที่สุดในเวลานี้ บทความนี้สรุปครบทั้งหลักสูตร 14 บทเรียน + 8 โปรเจกต์ลงมือทำจริง พร้อมแจกฟรีไฟล์ .zip รวม 9 Starter Templates จากคลัง Resource Library เพื่อให้นำไปวางใช้ใน Repo ของคุณได้ทันทีครับ
รวบรวมครบทั้ง 9 ไฟล์ต้นฉบับจาก Resource Library ของคอร์ส (รวม clean-state-checklist.md, session-handoff.md, evaluator-rubric.md และ quality-document.md) ใช้ได้กับทั้ง Claude Code, Codex และ Antigravity

Harness Engineering ไม่ได้ทำให้ AI Model ฉลาดขึ้นในเชิงพารามิเตอร์ แต่มันสร้างสภาพแวดล้อมที่บังคับให้ผลลัพธ์ของ Agent เสถียร ตรวจสอบได้ และทำงานต่อข้ามเซสชันได้จริง
1. ทำไมโมเดลเขียนโค้ดเก่ง แต่ทำงานใน Repo จริงกลับพัง? (The Harness Pattern)
คำถามที่คอร์สตั้งไว้ตั้งแต่นาทีแรกไม่ใช่ “AI เขียนโค้ดได้ไหม” เพราะคำตอบคือได้แน่นอน แต่คำถามจริงคือ “AI Agent สามารถปิดงานวิศวกรรมจริงใน Repository จริง ข้ามหลาย Session ต่อเนื่อง โดยไม่ต้องมีคนนั่งเฝ้าทุกบรรทัดได้หรือไม่?” — คำตอบตอนนี้คือ ไม่ได้ หากไม่มี Harness
“The MODEL decides what code to write. The HARNESS governs when, where, and how it writes it. The harness doesn’t make the model smarter. It makes the model’s output reliable.”
| สถานการณ์ทำงานจริง | Without Harness (สั่งผ่าน Prompt ล้วน) | With Harness (มีระบบนิเวศคุม Agent) |
|---|---|---|
| เริ่ม Session ใหม่ | Agent เดาบริบทใหม่ ทำของเก่าพัง หรือถามซ้ำในสิ่งที่ทำไปแล้ว | อ่าน AGENTS.md, รัน ./init.sh, เช็ก claude-progress.md และ feature_list.json ทันที |
| การคุมขอบเขตงาน (Scope) | พยายามทำ 3–5 ฟีเจอร์พร้อมกัน แล้วค้างครึ่งๆ กลางๆ ทุกจุด | ล็อกกฎ single_active_feature: true ทำเสร็จทีละ 1 ฟีเจอร์พร้อมหลักฐานจริง |
| คำนิยามว่า “เสร็จแล้ว” | Agent คิดเอาเองว่าน่าจะถูก แล้วประกาศชัยชนะก่อนรันเทสต์ | ห้ามหยุดจนกว่า Test, Lint, Type-check และ Smoke / E2E Pipeline จะรันผ่านจริง |
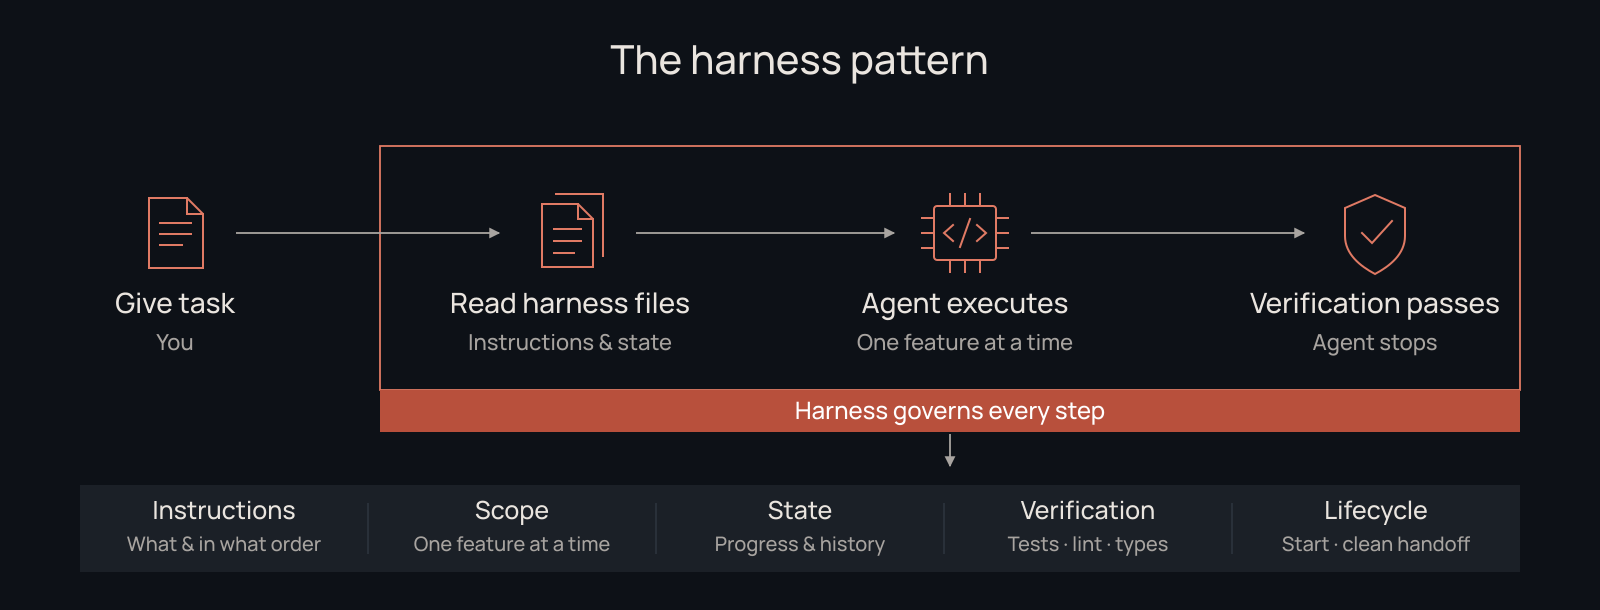
แผนภาพทางการจาก walkinglabs/learn-harness-engineering: The Harness Pattern — กำหนดคำสั่ง ขอบเขต สถานะ การตรวจสอบ และ Session Lifecycle รอบตัว Agent
2. เจาะลึก 5 ระบบย่อยของ Harness (The 5 Harness Subsystems)
คอร์สสรุปว่า Harness Engineering ไม่ใช่เรื่องของการเขียน Prompt ให้ยาวขึ้น แต่คือการออกแบบ “ระบบ 5 ส่วน” ให้โมเดลทำงานอยู่ข้างใน:
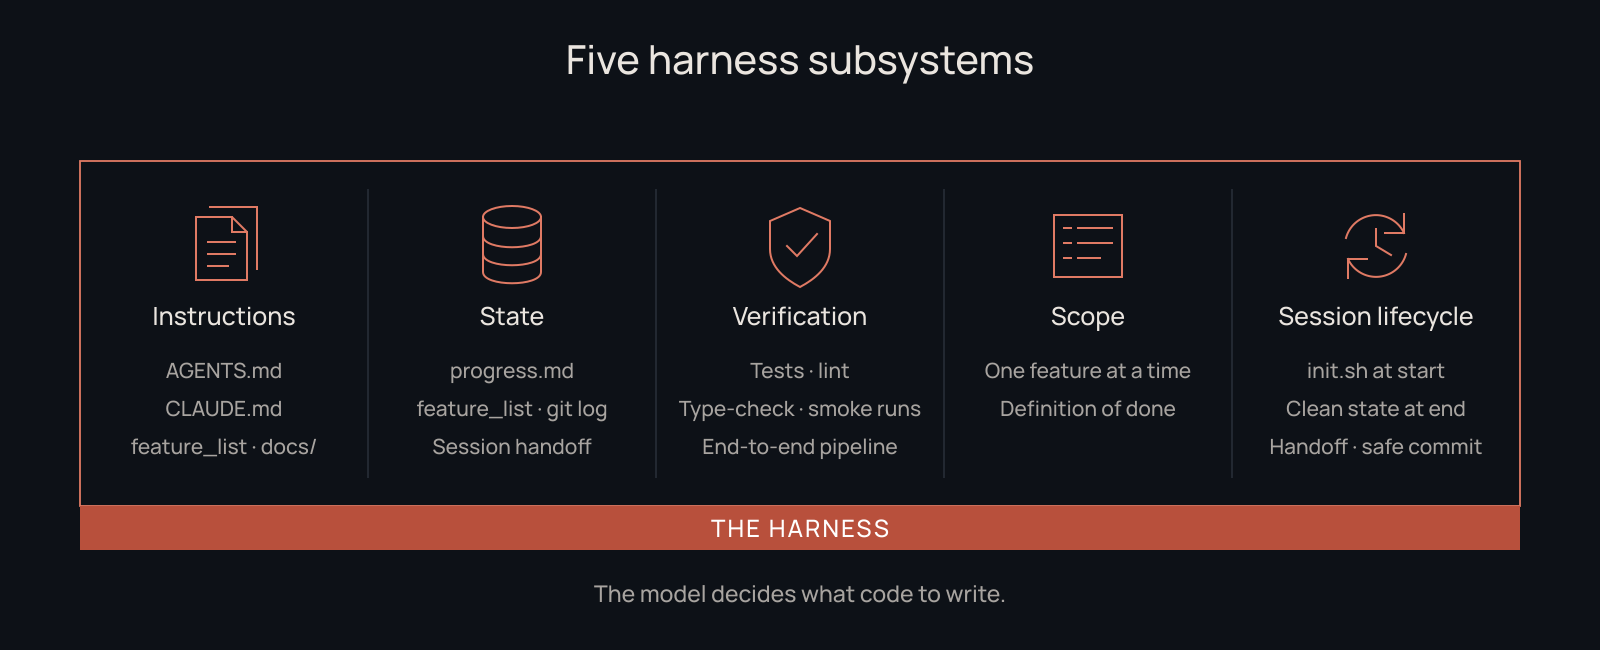
5 ระบบย่อยที่เป็นแกนหลักของ Harness: Instructions, State, Verification, Scope และ Session Lifecycle
- Instructions (กติกาและแผนที่นำทาง): เก็บใน
AGENTS.md,CLAUDE.md, และโฟลเดอร์docs/โดยใช้หลัก Progressive Disclosure — ให้ไฟล์หลักเป็นสารบัญชี้ทางไปอ่านรายละเอียดเฉพาะตอนที่ต้องใช้ แทนที่จะยัดสารานุกรมทุกอย่างลงใน 1 ไฟล์จนกิน Context Window เต็ม - State (หน่วยความจำถาวรบนดิสก์): เก็บใน
claude-progress.md,feature_list.json,git logและsession-handoff.mdเพื่อบันทึกว่าทำอะไรผ่านไปแล้ว อะไรยังพังอยู่ และ Session ถัดไปต้องหยิบงานไหนต่อ - Verification (หลักฐานที่รันจริงเท่านั้น): Test, Lint, Type-check, Smoke Run และ E2E Pipeline — Agent ไม่มีสิทธิ์ปิดงานด้วยคำพูดว่า “ดูเรียบร้อยแล้ว” แต่ต้องมีหลักฐานผลการรันแนบลงไฟล์
- Scope (การตีกรอบทีละ 1 ฟีเจอร์): ป้องกันอาการ Overreach & Under-finish และห้าม Agent แอบแก้ไขสเปกหรือลบรายการใน
feature_list.jsonเพื่อซ่อนงานที่ไม่ผ่าน - Session Lifecycle (พิธีเปิด-ปิดเซสชัน): เริ่มด้วยสคริปต์
./init.shตรวจสุขภาพระบบก่อนเขียนโค้ดแม้แต่บรรทัดเดียว และปิดท้ายด้วยclean-state-checklist.mdก่อน Commit
3. วงจร 16 ขั้นตอนของ Agent Session Lifecycle (Start → Select → Execute → Wrap Up)
แทนที่จะปล่อย Agent ทำงานตามใจชอบ คอร์สวางวงจรบังคับไว้ 4 ช่วง 16 ขั้นตอน เพื่อให้ทุก Session สามารถหยุด พัก และส่งไม้ต่อได้โดยไม่ทำ Repo พัง:
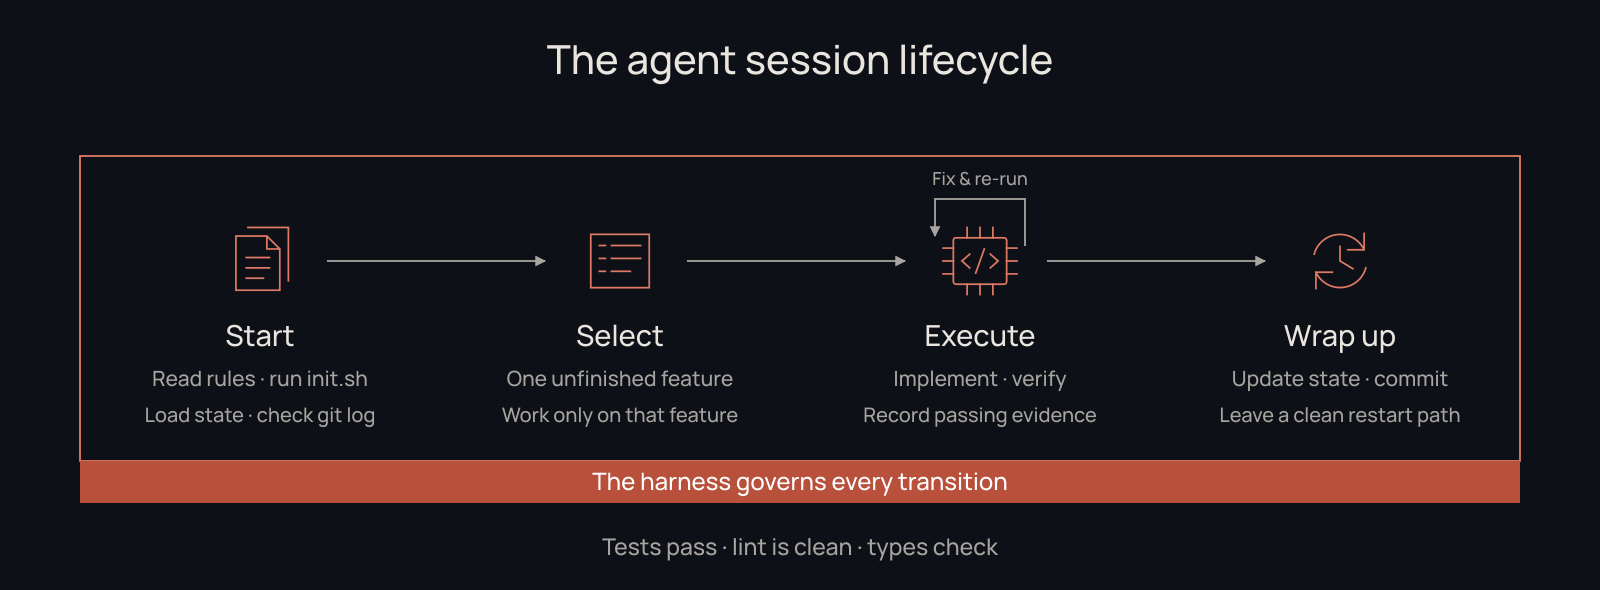
วงจร 16 ขั้นตอนของแต่ละ Agent Session ตั้งแต่ Start → Select → Execute/Verify Loop → Wrap Up
- START (ขั้น 1–5): อ่าน
AGENTS.md/CLAUDE.md→ รัน./init.sh→ อ่านclaude-progress.md→ อ่านfeature_list.json→ เช็กgit logล่าสุด - SELECT (ขั้น 6–7): เลือก เพียง 1 ฟีเจอร์ ที่ยังไม่เสร็จ และล็อกขอบเขตการทำงานอยู่แค่ฟีเจอร์นั้น
- EXECUTE & VERIFY (ขั้น 8–11): พัฒนาฟีเจอร์ → รัน Verification ครบชุด → ถ้าพังให้วนซ่อมและรันใหม่ → ถ้าผ่านให้เก็บหลักฐาน (Evidence)
- WRAP UP (ขั้น 12–16): อัปเดต
claude-progress.md→ อัปเดตสถานะในfeature_list.json→ จดสิ่งที่ยังพังหรือยังไม่ตรวจ → Commit เฉพาะเมื่อ Repo อยู่ในสภาพปลอดภัยพร้อมรันต่อ → ทิ้ง Restart Path ที่สะอาดให้ Session หน้า
4. แผนผังการเรียน 8 เฟส: ครบทั้ง 14 บทเรียน (L01–L14) & 8 โปรเจกต์จริง (P01–P08)
ความเจ๋งของหลักสูตรนี้คือทุกโปรเจกต์ P01 ถึง P08 สร้างอยู่บนแอปจริงเดียวกันคือ Electron-based Personal Knowledge Base Desktop App (แอปจัดการเอกสารส่วนตัว นำเข้าไฟล์ ทำ Indexing และถาม-ตอบ AI พร้อม Citation) โดยผลเฉลยของ P(N) จะเป็นโค้ดตั้งต้นของ P(N+1) ทำให้ผู้เรียนเห็นพัฒนาการความเสถียรของ Agent แบบก้าวกระโดดในทุกเฟส:
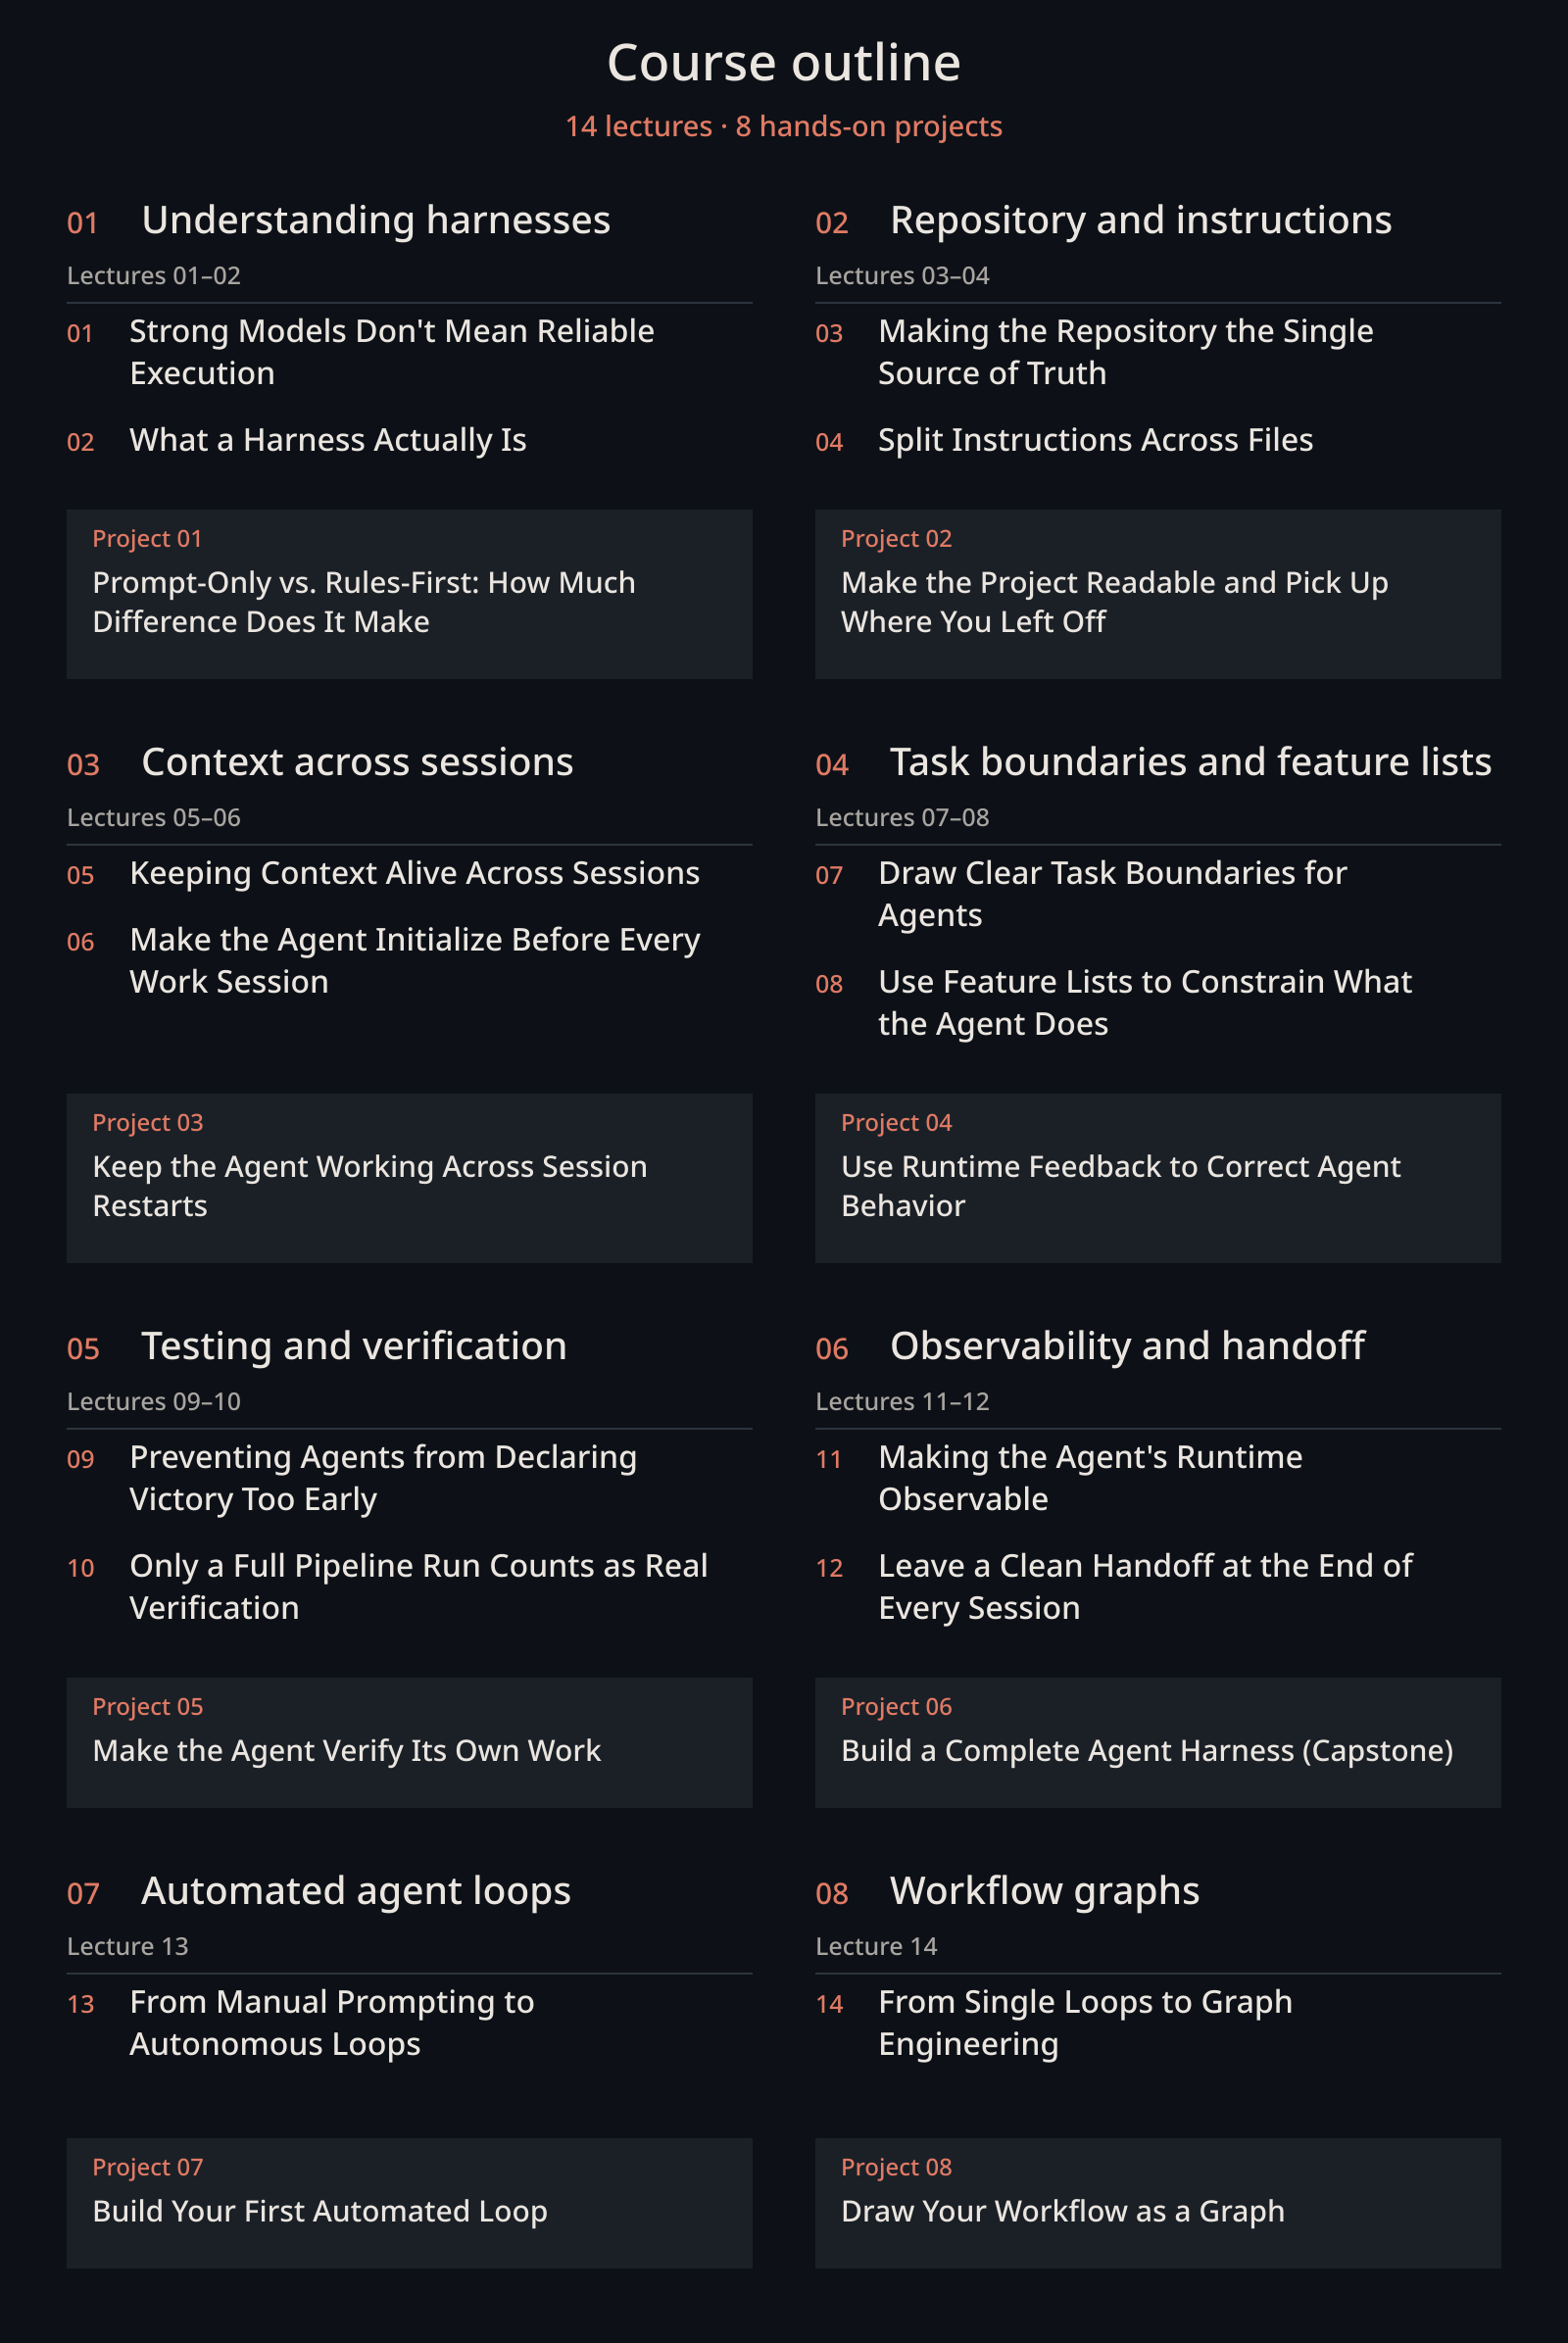
8 เฟสการเรียนรู้: ตั้งแต่ Prompt-Only Compare ไปจนถึง Complete Harness, Loop Engineering (P07) และ Graph Engineering (P08)
| เฟส (Phase) | Lectures (ทฤษฎี) | Project (ลงมือทำจริง) | กลไก Harness ที่ได้เรียนรู้ |
|---|---|---|---|
| Phase 1: See The Problem | L01 Strong models ≠ reliableL02 5 Harness Subsystems |
P01 Prompt-only vs Rules-first |
เทียบงานเดียวกันแบบไม่ใส่ vs ใส่ AGENTS.md + init.sh + feature_list.json |
| Phase 2: Structure The Repo | L03 Repo as System of RecordL04 Split docs (No 1 giant file) |
P02 Agent-Readable Workspace |
จัดโครงสร้างเอกสารใน Repo ให้ Agent ค้นหาเจอตามหลัก Progressive Disclosure |
| Phase 3: Connect Sessions | L05 Multi-Session ContinuityL06 Dedicated Init Phase |
P03 Multi-Session Continuity |
claude-progress.md + Session Handoff ให้ต่อยอดข้ามวันได้ไม่หลุด |
| Phase 4: Feedback & Scope | L07 Task BoundariesL08 Feature Lists Primitive |
P04 Incremental Indexing |
ทำระบบคุม Scope ด้วย Runtime Feedback ไม่ให้ Agent ทำเกินหรือทำขาด |
| Phase 5: Verification | L09 Anti Early VictoryL10 Full-Pipeline E2E Tests |
P05 Grounded Q&A Verification |
บังคับให้ Agent ตรวจคำตอบและ Citations จาก Pipeline จริงก่อนปิดงาน |
| Phase 6: Put It All Together | L11 Observability in HarnessL12 Clean State Handoff |
P06 Complete Harness Capstone |
รวมทุกกลไก + Log Observability + Ablation Study เทียบผลจริง |
| Phase 7: Automate The Loop | L13 Loop Engineering |
P07 Your First Automated Loop |
เลิกนั่งพิมพ์ Prompt คุมเอง → สร้าง Goal Loops, Timer Loops และ Maker-Checker Separation |
| Phase 8: Structure The System | L14 Graph Engineering |
P08 Workflow as a Graph |
แปลง Loop เป็น Explicit Nodes/Edges, Shared State, Fan-out/Fan-in, Rollback & HITL |
5. Quick Start: 4 ไฟล์ตั้งต้นวางลงโปรเจกต์ได้ทันที (ไม่ต้องรอเรียนจบครบ 14 บท)
ผู้สอนแนะนำว่าแม้ยังไม่เริ่มทำโปรเจกต์ในคอร์ส แค่คุณเพิ่ม 4 ไฟล์มาตรฐาน ด้านล่างลงที่ Root ของ Repo คุณก็จะเห็นความเสถียรของ AI Agent ดีขึ้นทันที (โหลดครบทั้ง 9 เทมเพลตได้ที่ ลิงก์ .zip ฟรีด้านบน):
YOUR PROJECT ROOT/
├── AGENTS.md              # คู่มือปฏิบัติการของ Agent (หรือ CLAUDE.md สำหรับ Claude Code)
├── init.sh                # สคริปต์ install + verify + baseline check ก่อนเริ่มงานทุกครั้ง
├── feature_list.json      # แหล่งความจริงเดียว (Source of Truth) ว่าฟีเจอร์ไหนผ่าน/ไม่ผ่าน
├── claude-progress.md     # บันทึกความคืบหน้าข้าม Session (ใช้ได้กับ Codex, Antigravity, OpenHands)
└── src/                   # โค้ดแอปจริงของคุณ
ตัวอย่าง AGENTS.md & feature_list.json ต้นฉบับจากคอร์ส
# Startup Workflow (จาก docs/en/resources/templates/AGENTS.md)
1. Confirm the working directory with `pwd`.
2. Read `claude-progress.md` for the latest verified state and next step.
3. Read `feature_list.json` and choose the highest-priority unfinished feature.
4. Review recent commits with `git log --oneline -5`.
5. Run `./init.sh`.
6. Run the required smoke or end-to-end verification before starting new work.

# Working Rules
- Work on one feature at a time (single_active_feature: true).
- Do not mark a feature complete just because code was added.
- Do not silently change verification rules during implementation.
- End Of Session: Update claude-progress.md → feature_list.json → Commit only when safe.
// กฎเหล็กใน feature_list.json
{
  "rules": {
    "single_active_feature": true,
    "passing_requires_evidence": true,
    "do_not_skip_verification": true
  },
  "status_legend": {
    "not_started": "Work has not begun.",
    "in_progress": "The feature is the current active task.",
    "blocked": "Work cannot continue until a documented blocker is resolved.",
    "passing": "Required verification has passed and evidence is recorded."
  }
}
อยากเปิดเว็บคอร์สอ่านออฟไลน์บนเครื่องตัวเอง (VitePress)
git clone https://github.com/walkinglabs/learn-harness-engineering.git
cd learn-harness-engineering
npm install
npm run docs:dev
ดาวน์โหลด 9 Starter Templates ฟรี & ต่อยอดสาย Harness Engineering
โหลดชุดเทมเพลตมาตรฐานครบ 9 ไฟล์ไปวางใน Repo ของคุณ อ่านคู่มือ CLEAR Framework × AI Agent หรือลงเรียนจับมือทำกับ อ. Kevin